

Grifco Roller Door Instruction Manual: A Comprehensive Guide
This manual details the installation and operation of Grifco roller doors, including the eDrive 2.0 system and utilizing extension kits like ESK01.
Accessing manuals via WhatsApp Web offers convenient support, ensuring safe and efficient door usage for installers and operators alike;
Grifco roller doors represent a commitment to robust and reliable access solutions, serving both residential and commercial applications. This manual provides comprehensive guidance for the successful installation and operation of your Grifco door system, specifically focusing on the advanced eDrive 2.0 technology.
Understanding the intricacies of your door is paramount for safety and longevity. Grifco doors are designed for various constructions – bi-fold, vertical lift, sectional, and continuous steel roller doors – demanding careful attention during setup.
This guide will walk you through each stage, from pre-installation checks to final adjustments, ensuring seamless integration and optimal performance. Utilizing resources like WhatsApp Web for quick access to updated manuals further enhances the user experience, providing readily available support when needed.
Safety Precautions
Prioritizing safety is crucial during the installation, maintenance, and operation of your Grifco roller door. Ensure all personnel involved are thoroughly familiar with these instructions and adhere to them strictly. Disconnect power supply before any maintenance or wiring procedures to prevent electrical hazards.
Never attempt to operate the door if damaged or malfunctioning. Immediately address any issues and consult a qualified technician. Keep the area clear of obstructions during operation, and never allow anyone to stand directly in the door’s path.
Proper installation is vital for safe operation; utilize a Grifco Controller Extension Kit (ESK01) when necessary. Regularly inspect all components for wear and tear, and always follow lubrication guidelines.
Understanding the Grifco eDrive 2.0 System
The Grifco eDrive 2.0 is a sophisticated operator system designed for reliable roller door control. It’s suitable for various door constructions, including bi-fold, vertical lift, sectional, and continuous steel roller doors; This system features advanced functionality, allowing for precise door travel adjustment and programmable intermediate stops.
Correctly identifying the door direction is essential during setup; adjustments can be made while holding the set button. The eDrive 2.0 facilitates a smooth transition to the balance point, typically around half of the total door travel.
Understanding the system’s capabilities ensures optimal performance and longevity, particularly when integrated with extension kits like ESK01.
Components of a Typical Grifco Roller Door Installation
A standard Grifco roller door installation comprises several key components. These are broadly categorized into door components, operator components, and control system components, working in harmony for seamless operation; The operator, often the eDrive 2.0, is central to the system’s functionality.
Essential elements include the door itself, the operator unit, a control system (potentially expandable with a Controller Extension Kit – ESK01), and the necessary wiring and conduit for power supply.

Proper installation requires careful attention to each component, ensuring correct connections and adherence to safety guidelines for a secure and efficient system.
Door Components
The door itself is comprised of interlocking slats, forming a robust curtain that rolls up and down. These slats are typically constructed from steel, offering durability and security. Supporting the curtain are side guides, ensuring smooth vertical movement and alignment during operation.
A crucial element is the barrel, around which the curtain wraps during opening. The hood cover protects the rolled-up curtain and operator from the elements; Furthermore, the door’s construction must be rigid, especially for commercial applications like bi-fold or sectional doors, to ensure compatibility with the Grifco eDrive 2.0 system.
Operator Components

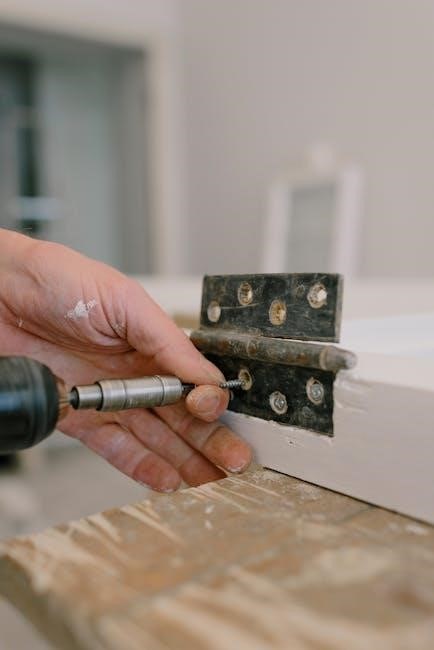
The Grifco eDrive 2.0 operator is the heart of the system, providing the power to open and close the door. It features a robust motor and gearbox, designed for reliable performance. An enclosure houses these components, protecting them from dust and moisture.
Crucially, the operator includes limit switches, essential for defining the door’s open and close positions. Additionally, a control board manages the operator’s functions, receiving signals from the control system. The operator connects to the door via a drive shaft, transferring rotational motion into linear movement.
Control System Components
The Grifco control system provides user interaction and operational management. A key component is the remote control, enabling convenient door operation from a distance. The control board, integrated within the operator, processes signals from the remote and other inputs.
Furthermore, the system may include wall-mounted buttons for local control. Importantly, the Grifco Controller Extension Kit (ESK01) expands functionality, allowing integration with existing building management systems. Wiring harnesses connect these components, ensuring reliable communication. Finally, the system supports programming intermediate stops and setting the balance point for smooth operation.

Pre-Installation Checklist
Before commencing installation, verify all components are present and undamaged. Confirm the roller door and frame are structurally sound and correctly aligned. Ensure a suitable power supply is available, adhering to local electrical codes. Check for any obstructions in the door’s travel path.

Additionally, review the complete instruction manual for a thorough understanding of the process. If the door direction needs correction, be prepared to adjust settings during installation. Consider utilizing the Grifco Controller Extension Kit (ESK01) if integrating with existing systems. Finally, prioritize safety by disconnecting power before starting any electrical work.
Installation Process: Step-by-Step
Begin by carefully mounting the operator, ensuring secure attachment to the door frame. Next, connect the power supply, feeding leads through appropriate conduit entries. Proceed with wiring the control system, meticulously following the provided diagrams. After wiring, perform initial door travel adjustment to ensure smooth operation.
Crucially, set the door limits and functions, including open and close positions, and program any desired intermediate stops; Accurately determine and set the balance point, typically around half of the roller door’s travel. Regularly verify all connections and settings throughout the process for optimal performance.
Mounting the Operator
Securely attach the Grifco eDrive 2.0 operator to a structurally sound portion of the door frame, ensuring it can withstand operational forces. Verify the mounting surface is level and free from obstructions. Utilize appropriate fasteners, suitable for the frame material, to prevent movement during operation.
Pay close attention to the operator’s orientation; if the door direction is incorrect, adjustments can be made while holding the set button. Confirm adequate clearance around the operator for wiring and maintenance access. Proper mounting is fundamental for safe and reliable door function, preventing potential issues later.
Connecting Power Supply
Before connecting power, ensure the main power supply is switched off at the breaker; Open the operator enclosure and feed the power supply leads through the designated conduit entry point. Strictly adhere to local electrical codes and regulations during wiring. Verify the voltage matches the operator’s requirements to avoid damage.
Connect the power leads to the appropriate terminals within the operator, ensuring secure connections. Double-check all wiring before restoring power. Improper power connection can lead to operator malfunction or safety hazards; professional assistance is recommended if unsure.
Wiring the Control System
Carefully connect the control system wiring according to the provided wiring diagram. Ensure all connections are secure and properly insulated to prevent short circuits. Utilize a Grifco Controller Extension Kit (ESK01) if additional wiring length is required for the installation. Pay close attention to the polarity of connections, especially for remote control receivers.
If the door direction is incorrect, a wiring adjustment may be necessary while holding the set button. Verify all wiring before restoring power to the system. Incorrect wiring can cause unpredictable door behavior or damage to the control components; consult a qualified electrician if needed.
Door Travel Adjustment
Precise door travel adjustment is crucial for safe and reliable operation. Initially, set the open and close limits to approximately half of the roller door travel. This transition point defines the balance point, ensuring smooth acceleration and deceleration. Fine-tune these limits incrementally, observing the door’s movement during each adjustment.
Avoid setting limits too close to the extremes of travel, as this can strain the operator. For commercial doors, particularly those of rigid construction, careful adjustment is paramount. Regularly check and readjust travel limits as needed to compensate for seasonal changes or door wear.
Setting Door Limits and Functions
Properly setting door limits and functions ensures optimal performance and safety. Begin by establishing the full open and close positions, carefully observing the door’s travel. Utilize the control system to program these limits accurately, avoiding obstructions. Intermediate stops can be programmed for enhanced security or convenience, allowing partial door openings.
The balance point, typically around half the door’s travel, is critical for smooth operation. Ensure the operator transitions smoothly through this point. Explore additional functions, such as soft start and stop, to minimize stress on the door and operator. Refer to the controller’s specific documentation for detailed instructions.
Adjusting Open and Close Limits
Precise adjustment of open and close limits is vital for safe and efficient operation. Begin by powering the door and accessing the limit setting functions on the control system. Slowly adjust the limits, observing the door’s movement at each increment. Ensure the door fully opens without hitting the top travel limit and fully closes without binding.
If the door direction is incorrect, utilize the control system’s settings to reverse it while holding the set button. Double-check these settings after any adjustments. Remember to test the limits multiple times to confirm accuracy and prevent potential damage. Refer to the manual for specific controller instructions.
Programming Intermediate Stops
Intermediate stops offer enhanced control and safety, allowing the door to pause at desired points during operation. Access the programming mode on your Grifco controller to define these stops. Carefully select the positions along the door’s travel path where you want the door to pause.
Utilize the control system’s interface to input the stop points, often expressed as percentages of total door travel. Test each programmed stop thoroughly to ensure accurate positioning. These stops are particularly useful for loading docks or areas requiring partial door openings. Refer to the manual for detailed programming instructions specific to your controller model.
Setting the Balance Point
The balance point is crucial for smooth and efficient operation, representing the transition halfway through the roller door’s travel. Accurate setting minimizes stress on the motor and ensures reliable performance. During programming, the system identifies this point automatically, often requiring a full door cycle.
Observe the door’s movement carefully during this process; the controller will typically indicate when the balance point is detected. Incorrect balance point settings can lead to jerky movements or operational failures. Confirm the setting by testing the door’s responsiveness to open and close commands. Consult the manual for specific instructions tailored to your Grifco eDrive 2.0 system.
Troubleshooting Common Issues
Common problems include doors failing to open or close, remote control malfunctions, and operator overheating. For a door that won’t operate, check the power supply and wiring connections first. Remote issues often stem from battery depletion or signal interference; re-pair the remote with the control system.
Overheating suggests excessive use or a mechanical obstruction; allow the operator to cool before attempting further operation. If the door direction is incorrect, utilize the set function while holding the button. Always refer to the manual for detailed diagnostic steps and safety precautions before attempting any repairs.

Door Not Opening/Closing
If your Grifco roller door fails to open or close, begin by verifying the power supply is correctly connected and functioning. Inspect all wiring connections to the operator and control system for looseness or damage; Ensure no obstructions are present in the door’s path, as even small items can trigger safety mechanisms.
Check the door limits are correctly set; incorrect limits can prevent full travel. Confirm the balance point is properly adjusted, as an imbalance can strain the operator. If issues persist, consult the full installation manual for detailed troubleshooting steps and safety guidelines before attempting repairs.
Remote Control Malfunctions
If your Grifco roller door’s remote control isn’t functioning, first check the battery within the remote itself, replacing it if necessary. Ensure there’s a clear line of sight between the remote and the operator’s receiver; obstructions can interfere with the signal. Verify the remote is paired correctly with the control system – refer to the manual for re-pairing instructions.
If multiple remotes are used, test each one individually to isolate the problem. Interference from other devices can sometimes cause issues; try relocating the operator’s antenna. For persistent problems, consult the full manual or contact Grifco support for assistance.
Operator Overheating
If the Grifco eDrive 2.0 operator overheats, immediately cease all operation of the door. Overheating typically indicates excessive use or a mechanical issue causing strain on the motor. Allow the operator to cool down completely before attempting further operation – this may take several hours.
Check for obstructions in the door’s path that could be forcing the operator to work harder. Ensure proper lubrication of all moving parts, as friction increases heat. If overheating persists, it suggests a potential fault within the operator itself; contact a qualified technician or Grifco support for inspection and repair.

Maintenance and Care
Regular maintenance is crucial for optimal Grifco roller door performance and longevity. Conduct routine inspections of all components, paying close attention to the door’s tracks, springs, and hinges for any signs of wear or damage. Ensure the operator is free from debris and that all electrical connections remain secure.
Follow the lubrication guidelines provided in this manual, applying appropriate lubricants to moving parts to reduce friction. Address any issues promptly to prevent minor problems from escalating into costly repairs. Consistent care extends the lifespan of your Grifco door system and ensures continued safe operation.
Regular Inspection Points
Consistent inspections are vital for a safe and functional Grifco roller door. Begin by examining the door’s tracks for obstructions or damage, ensuring smooth operation. Check the springs for tension and corrosion, and verify hinge integrity. Inspect the roller door itself for dents, bends, or signs of wear.
Thoroughly assess the operator unit, looking for loose connections or unusual noises. Review the control system, confirming proper functionality of all buttons and safety features. Regularly check the balance point to ensure the door moves effortlessly. Document all findings and address any concerns immediately.
Lubrication Guidelines
Proper lubrication extends the lifespan of your Grifco roller door. Utilize a silicone-based lubricant, avoiding oil-based products that attract dirt. Apply lubricant to the door’s tracks, ensuring even distribution for smooth rolling. Grease the hinges and springs to prevent corrosion and maintain flexibility.
Lubricate the operator’s chain or belt drive (if applicable) according to the manufacturer’s recommendations. Avoid over-lubrication, as excess can collect debris. Regularly wipe away any excess lubricant to maintain cleanliness. Inspect and lubricate components at least twice yearly, or more frequently in harsh environments.

Grifco Controller Extension Kit (ESK01) Usage

The Grifco Controller Extension Kit (ESK01) expands system capabilities, enabling control from additional locations or integrating with existing building management systems. This kit is available from local roller shutter dealers or directly from Grifco. Installation requires a basic understanding of electrical wiring; professional installation is recommended.
ESK01 allows for remote access and control, enhancing convenience and security. Carefully follow the included wiring diagrams to ensure correct connections. The kit supports extended wiring runs, but observe voltage drop limitations. Properly secure all wiring and test functionality after installation.
WhatsApp Web Integration (Related to Accessing Manuals)
Grifco leverages WhatsApp Web for streamlined access to manuals and support resources. Utilizing WhatsApp Web on your desktop or tablet eliminates the need for constant phone checking, offering a convenient second-screen experience. Simply link your mobile WhatsApp to the web interface through a browser – no phone app required.
This integration provides quick access to troubleshooting guides, installation instructions, and direct communication with Grifco support. Share photos or videos of issues for faster diagnosis. WhatsApp Web mirrors your phone’s functionality, allowing you to send messages, files, and voice notes. It’s a practical solution for on-site assistance.