

Singer Stylist 7258 Manual: A Comprehensive Guide
This guide offers detailed instructions for the Singer Stylist 7258, covering setup, operation, troubleshooting, and maintenance. Download the PDF manual!
Explore features, stitch patterns, and resources for a seamless sewing experience with your new machine.
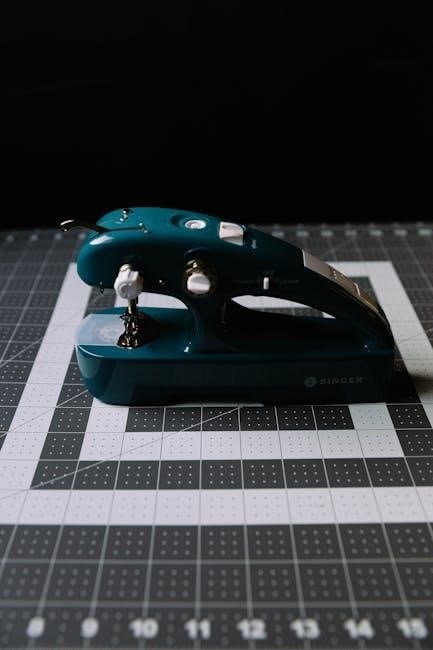
The Singer Stylist 7258 is a popular sewing machine known for its versatility and user-friendly design. This machine caters to both beginners and experienced sewists, offering a wide range of stitches and features. Its robust construction ensures durability, making it a reliable companion for various sewing projects.
This manual serves as a comprehensive guide to unlock the full potential of your Singer Stylist 7258. We will explore everything from initial setup and threading to advanced techniques like buttonholes and zippers. Accessing the downloadable PDF manual provides a convenient reference for all your sewing needs. Discover a community of sewing enthusiasts for support and inspiration!
Overview of Features and Capabilities
The Singer Stylist 7258 boasts 80 built-in stitches, including decorative, alphabet, and stretch stitches, offering immense creative flexibility. It features an automatic needle threader, simplifying the threading process and saving valuable time. Adjustable stitch length and width provide customization for diverse fabrics and techniques.
This machine is compatible with a variety of presser feet, expanding its capabilities for specialized projects. Its free arm facilitates easy sewing of cuffs, sleeves, and other cylindrical shapes. The drop-in bobbin ensures smooth and consistent stitching. Explore online forums and communities for inspiration and support!
Understanding the Machine Components
The Singer Stylist 7258 comprises several key components. The power switch controls operation, while the foot pedal regulates sewing speed. The stitch selection dial allows choosing from 80 built-in stitches. The bobbin winder prepares bobbins for consistent stitching.
The needle clamp secures the needle, and the presser foot applies pressure to the fabric. The feed dogs advance the fabric under the needle. The tension dial adjusts thread tension for optimal stitch quality. Familiarize yourself with these parts for efficient operation and maintenance.

Setting Up Your Singer Stylist 7258
Prepare your machine by winding the bobbin, threading correctly, and selecting the appropriate needle. Ensure proper setup for optimal sewing performance.
Initial Machine Setup
Begin by placing the Singer Stylist 7258 on a stable, level surface. Connect the power cord and ensure the power switch is off. Attach the presser foot, selecting the all-purpose foot for general sewing. Install a new needle, compatible with your fabric type, firmly into the needle clamp.
Raise the presser foot lever and the needle plate cover. Insert the spool of thread onto the spool pin, securing it with a spool cap. Familiarize yourself with the machine’s key components, referencing the detailed diagrams in the manual. Proper initial setup is crucial for smooth operation and preventing potential issues later on.
Winding the Bobbin
Place the thread spool on the spool pin and guide the thread through the thread guides. Attach the thread end to the bobbin, ensuring it’s securely wound around it a few times. Position the bobbin onto the bobbin winder spindle.
Engage the bobbin winder by pushing it to the right. Press the foot pedal gently to start winding; the machine will automatically stop when full. Remove the bobbin and trim the thread end. Properly wound bobbins are essential for consistent stitch quality and preventing thread nests.
Threading the Machine
Begin by raising the presser foot and ensuring the needle is in its highest position. Guide the thread from the spool, through the first thread guide, and down to the tension disc. Next, thread the take-up lever and continue down to the needle clamp;
Thread the needle from front to back. Finally, draw up the bobbin thread by holding the needle thread and turning the handwheel. Correct threading is crucial for proper stitch formation and preventing machine malfunctions. Refer to the machine’s diagrams for visual guidance.

Basic Sewing Operations
Master fundamental techniques like stitch selection, length/width adjustments, and straight stitching. Practice these skills for consistent, quality results with your Singer 7258.
Selecting Stitches
The Singer Stylist 7258 boasts a diverse range of stitches, catering to various sewing projects. To select a stitch, locate the stitch selection dial, typically positioned on the front of the machine. Rotate the dial to align your desired stitch number with the indicator mark.
Refer to the stitch guide within the manual for visual representations and recommended applications for each stitch. Decorative stitches add embellishment, while utility stitches are ideal for garment construction. Experiment with different stitches to achieve unique effects. Ensure the correct presser foot is installed for optimal stitch performance. Understanding stitch functionality unlocks the machine’s full potential.
Adjusting Stitch Length and Width
The Singer Stylist 7258 allows precise control over stitch length and width, crucial for fabric compatibility and desired aesthetics. Stitch length is adjusted using a slider or dial, influencing the density of stitches. Shorter lengths are suitable for delicate fabrics, while longer lengths work well with heavier materials.
Stitch width, controlling the zigzag pattern’s breadth, is adjusted similarly. Wider widths are ideal for decorative applications and stretch fabrics. Always test adjustments on scrap fabric before sewing your project. Refer to the manual’s stitch guide for recommended settings. Proper adjustment ensures professional-looking results.
Sewing Straight Stitches
To sew a straight stitch on the Singer Stylist 7258, select the straight stitch option, typically stitch number one. Ensure the stitch length is appropriate for your fabric – a medium length (2.5mm) is a good starting point. Guide the fabric gently under the presser foot, keeping the edge aligned with the seam guide on the needle plate.
Maintain a consistent speed and avoid pulling or pushing the fabric. Backstitch at the beginning and end of the seam to secure the stitches. Practice on scrap fabric to develop a smooth, even sewing technique. Regular practice builds confidence and precision.

Advanced Sewing Techniques
Master buttonholes, zippers, and diverse presser feet with your Singer Stylist 7258. Unlock creative potential and elevate your sewing projects today!
Using Different Presser Feet
The Singer Stylist 7258 boasts compatibility with a wide array of presser feet, expanding its capabilities beyond basic sewing. Explore the all-purpose foot for everyday stitching, the zipper foot for precise zipper applications, and the buttonhole foot for consistently perfect buttonholes.
Consider the satin stitch foot for beautiful decorative stitches, and the open toe foot for enhanced visibility when working with thicker fabrics or specialty threads. Investing in additional presser feet unlocks a world of creative possibilities, allowing you to tackle diverse projects with confidence and professional results. Refer to your manual for specific foot recommendations based on your fabric and stitch selection;
Sewing Buttonholes
The Singer Stylist 7258 simplifies buttonhole creation with its automatic buttonhole function. Begin by selecting the appropriate buttonhole stitch on your machine and attaching the buttonhole foot. Measure the button you’ll be using and adjust the buttonhole length accordingly using the machine’s settings.
Follow the markings on the needle plate as a guide while sewing, ensuring consistent results. The machine will automatically stitch the buttonhole outline, and you simply need to clip the threads. Practice on scrap fabric first to perfect your technique and achieve professional-looking buttonholes every time.
Sewing Zippers
The Singer Stylist 7258 offers several options for inserting zippers, including the zipper foot for both standard and invisible zippers. Attach the appropriate zipper foot to your machine. Position the zipper teeth evenly along the fabric edge, and begin sewing close to the teeth, guiding the fabric smoothly.
For invisible zippers, use the invisible zipper foot and follow the designated guide on the foot. Maintain a consistent seam allowance for a professional finish. Practice on scrap fabric to master the technique before working on your final project, ensuring a neat and secure zipper installation.
Troubleshooting Common Issues
Resolve frequent problems like needle breakage, thread jamming, or the machine failing to power on with our guide. Find quick solutions!
Needle Breaking Problems
Frequent needle breakage can be frustrating, but often stems from simple fixes. Ensure you’re using the correct needle type and size for your fabric weight; a mismatched needle strains the machine.
Always re-thread the machine correctly, verifying the presser foot is up during threading. Incorrect threading creates tension issues. Check for bent or damaged needles before each project.
Avoid sewing over pins, as this is a common cause of breakage. Also, ensure the needle is fully inserted into the needle clamp. Finally, slow down your sewing speed, especially with thicker materials.
Thread Jamming Solutions
Thread jamming often indicates tension imbalances or improper threading. Begin by re-threading both the upper and lower threads, ensuring they are correctly seated in the tension discs. Clean the bobbin area thoroughly, removing any lint or debris that may be obstructing the thread path.
Verify the presser foot is down while sewing, as this engages the tension mechanism. Use high-quality thread and check for knots or weak spots. Adjust the upper tension dial incrementally, testing after each adjustment.
Finally, slow down your sewing speed, allowing the machine to properly manage the thread.
Machine Not Powering On
If your Singer Stylist 7258 fails to power on, first check the power cord connection at both the machine and the wall outlet. Ensure the outlet is functioning correctly by testing it with another device. Verify the power switch is firmly in the “on” position.
Inspect the fuse located within the machine (refer to the manual for location). Replace a blown fuse with one of the correct amperage. If the issue persists, there may be an internal electrical problem requiring professional service.
Do not attempt to disassemble the machine yourself.

Maintenance and Care
Regular cleaning and oiling are crucial for optimal performance. Follow the schedule in the manual to maintain your Singer Stylist 7258’s longevity.
Cleaning the Machine
Maintaining a clean Singer Stylist 7258 is vital for smooth operation and preventing issues. Always disconnect the power before cleaning! Use a soft brush to remove lint and dust from the bobbin area, feed dogs, and around the needle plate.
For tougher buildup, a lint roller can be effective; Wipe down the exterior with a damp cloth; avoid harsh chemicals. Periodically clean the internal mechanisms as detailed in the manual, ensuring all parts are dry before reassembling. Regular cleaning extends the machine’s life and ensures consistent stitch quality.
Oiling the Machine
Proper lubrication keeps your Singer Stylist 7258 running smoothly. Refer to the manual for specific oiling points – typically, these include the bobbin area, hook assembly, and any areas with moving parts. Use only sewing machine oil; other lubricants can cause damage.
Apply oil sparingly, a drop at a time, and wipe away any excess. Avoid over-oiling, as this attracts dust and lint. Regular oiling, as per the maintenance schedule, prevents friction and wear, extending the machine’s lifespan and ensuring optimal performance.
Regular Maintenance Schedule
To maintain peak performance, follow a consistent maintenance schedule for your Singer Stylist 7258. After every 8 hours of use, clean the bobbin area and remove lint. Monthly, oil the machine as detailed in the manual, focusing on moving parts.
Every six months, perform a more thorough cleaning, including the feed dogs and needle plate. Inspect the belt for wear and tear, and replace if necessary. Adhering to this schedule ensures longevity and prevents costly repairs, keeping your machine sewing beautifully.

Resources and Support
Find the Singer Stylist 7258 manual (PDF) online, plus support at the official Singer website. Join sewing communities for help!
Downloading the Manual (PDF)
Accessing a digital copy of the Singer Stylist 7258 manual in PDF format is remarkably straightforward. Singer provides a comprehensive, 84-page manual available for free download directly from their website.
This downloadable resource encompasses detailed instructions in English, French, and Spanish, ensuring accessibility for a wide range of users. Visit the manuals and updates page on the Singer website to locate and download the complete user guide.
Should you require a manual not currently listed, don’t hesitate to contact Singer’s support team for assistance. Having a digital copy readily available ensures you always have guidance at your fingertips.
Singer Website Support
The official SINGER website serves as a central hub for comprehensive support regarding your Stylist 7258 sewing machine. Beyond downloadable manuals, the site offers a wealth of resources, including frequently asked questions, troubleshooting guides, and helpful video tutorials.
You can find detailed information about compatible accessories, replacement parts, and even locate authorized service centers in your area. Singer’s online platform is designed to empower sewists of all levels, providing assistance for everything from basic operation to advanced techniques.
Explore the website to maximize your sewing experience and unlock the full potential of your machine.
Online Sewing Communities & Forums
Numerous online sewing communities and forums provide invaluable support for Singer Stylist 7258 owners. These platforms foster a collaborative environment where users share tips, troubleshoot issues, and exchange project ideas. Engage with fellow sewists to gain insights into maximizing your machine’s capabilities.
Dedicated threads often address specific questions about the 7258, offering solutions to common problems and showcasing creative applications. Benefit from the collective knowledge of experienced users and discover new techniques. These communities are excellent resources for inspiration and assistance.
Find help with garment sewing, quilting, and more!
Parts and Accessories
Locate replacement parts, compatible needles, and essential accessories for your Singer Stylist 7258. Ensure optimal performance and longevity with genuine Singer components.
Find presser feet and bobbins easily!
Finding Replacement Parts
Securing genuine Singer replacement parts for your Stylist 7258 is crucial for maintaining its performance and extending its lifespan. Numerous online retailers and sewing machine repair shops specialize in Singer parts. Begin your search on the official Singer website, which often provides a parts finder tool based on your machine model number.
Alternatively, explore reputable sewing supply stores and online marketplaces like eBay or Amazon. When ordering, always verify the part number to ensure compatibility. Consider contacting a local Singer authorized service center for assistance in identifying and sourcing specific parts, especially for more complex components. Proper part replacement guarantees continued smooth operation.
Compatible Needles
Selecting the correct needle is vital for optimal sewing results with your Singer Stylist 7258. This machine typically accommodates Singer Class 130/705H needles, available in various sizes and types. Universal needles are suitable for woven fabrics, while ballpoint needles are ideal for knits and stretch materials.
Denim or jeans needles are designed for heavier fabrics like denim and canvas. Consider the fabric weight and fiber content when choosing a needle size; finer fabrics require smaller needles. Regularly replacing your needle ensures clean stitches and prevents fabric damage. Always use high-quality Singer needles for best performance.
Essential Accessories
To maximize your Singer Stylist 7258’s capabilities, several accessories are highly recommended. A variety of presser feet, including a zipper foot, buttonhole foot, and all-purpose foot, expand your sewing options. Bobbins specifically designed for the 7258 are crucial for smooth operation. High-quality thread in various colors is also essential for diverse projects.
Seam rippers, fabric markers, and measuring tapes are indispensable tools. Consider a needle assortment pack for different fabric types. Investing in these accessories will enhance your sewing experience and unlock the full potential of your machine.

Understanding Stitch Patterns
The Singer Stylist 7258 offers decorative, alphabet, number, and stretch stitches. Explore the stitch guide to unlock creative possibilities for various sewing projects.
Decorative Stitch Guide
The Singer Stylist 7258 boasts a wide array of decorative stitches, enhancing your sewing projects with unique flair. Experiment with various patterns to add embellishments to garments, home décor, and quilting designs. Refer to the manual’s stitch guide for visual representations and recommended uses for each stitch.
Consider stitch density and width adjustments to customize the appearance. Utilize these stitches for monograms, decorative edging, or creating all-over textured effects. Practice on scrap fabric to master stitch selection and settings before applying them to your final project, ensuring beautiful and professional results.
Alphabet and Number Stitch Usage
The Singer Stylist 7258 allows for personalized creations with its alphabet and number stitches. Use these features to monogram towels, label quilts, or date your sewing projects for a custom touch. Consult the manual for stitch charts displaying the sequence of letters and numbers.
Carefully select the appropriate stitch settings for clear and legible results. Practice spacing and alignment on scrap fabric before stitching onto your final fabric. Remember to consider fabric weight and stabilizer use for optimal stitch definition and prevent puckering.
Stretch Stitch Applications
The Singer Stylist 7258’s stretch stitches are essential for sewing knit fabrics, providing the necessary give and recovery to prevent seams from breaking. Utilize these stitches when creating garments like t-shirts, leggings, or swimwear. Select a stretch stitch appropriate for the fabric’s weight and stretch percentage.
Experiment with different stitch widths and lengths on scrap fabric to achieve the desired stretch and appearance. Consider using a ballpoint needle designed for knit fabrics to avoid snagging or damaging the material. Proper tension is crucial for successful stretch stitching.
Safety Precautions
Always disconnect the machine before maintenance. Avoid injury by keeping fingers away from the needle. Ensure electrical safety and follow guidelines.
General Safety Guidelines
Before operating your Singer Stylist 7258, carefully read the entire manual to understand its functions and safety features. Always disconnect the power supply when threading, changing the needle, cleaning, or performing any maintenance. Keep fingers away from all moving parts, particularly the needle and presser foot, to prevent accidental injury.
Never sew over broken needles; this can cause damage to the machine and potential harm. Use only genuine Singer accessories and parts to ensure compatibility and safety. Do not attempt to repair the machine yourself; contact a qualified technician for assistance. Maintain a clean and well-lit workspace, free from clutter, to promote safe operation.
Electrical Safety
Ensure the power cord is in good condition and free from damage before each use. Never operate the Singer Stylist 7258 with a damaged cord or plug, as this poses an electrical hazard. Always plug the machine into a properly grounded outlet that matches the voltage specified on the machine’s label. Avoid using extension cords whenever possible; if necessary, use a heavy-duty extension cord rated for the machine’s amperage.
Do not expose the machine to moisture or operate it outdoors. Unplug the machine from the power outlet when not in use and during cleaning or maintenance. Never attempt to disassemble or repair the electrical components yourself.
Avoiding Injuries
Always keep fingers away from the needle while the machine is operating. Use the needle finger guard for added protection. Never sew over pins, as this can cause the needle to break and potentially cause injury. Turn off and unplug the machine before changing the needle, threading, or performing any maintenance. Keep the machine out of reach of children.
Exercise caution when using the foot pedal to control the sewing speed. Avoid reaching under the presser foot while the machine is running. Wear appropriate eye protection when performing tasks that may generate debris.